Start a Blog

How To Create a Website and Start a Blog to Make Money

Share

You are ready to start a blog (or maybe you’re just starting to think about it)!  YAY!  FANTASTIC!  And now you need to CREATE A WEBSITE FROM SCRATCH (enter panic.)  At least that was my first reaction!

One of the first things you need to do once you commit to start a blog, is to create a website.  Creating a website from scratch is THE MOST DAUNTING task you will face when you first want to start a blog.  The self-doubt voice shouts, “I’m not an IT Professional! How in the blazes will I make a website?!!”

Dear sweet friends, you are not alone. There are so many resources to help you every step of the way.  

I’m here to share my step-by-step process and tips on how to CREATE A WEBSITE from scratch and MAKE MONEY WITH A BLOG!

Let the fun begin!

how to create a website

DISCLAIMER: I will be sharing with you the products and services that have helped me successfully start my blog, Story Unwritten!  I am an affiliate for some of these products, so if you click on my links, I may earn a commission at no additional cost to you.  As a major penny-pincher myself, I only recommend the services that I trust and feel are most necessary or beneficial for blogging success!  ♥

Step 1: Get Prepared to Start a Blog

You can start a blog on any subject in the world, but you won’t make money if no one else is interested in it!

Start a blog on a subject you are PASSIONATE about, because you have to sustain writing about it for a very long time if you want to make money.

You want to be generally knowledgeable on your blog niche and absolutely LOVE IT.  If you can check those boxes, you’re on the right track. The last crictical box to check is “Does anyone else care about this niche?”  If not, find something else to blog about.  You need readers at the end of the day or you won’t make a penny!

Get prepared to start a blog by following these steps:

  1. PICK YOUR BLOG NICHE.  It helps to answer these questions:
    1. What is a subject I know well?
    2. What is a subject I LOVE to read about, talk about, and write about?
    3. What is a subject that also interests other people (lots of other people)?
    4. What problems can I solve for others with my blog?
    5. OTHER GREAT RESOURCES: How to Choose a Niche for Your Blog, How to Choose a Profitable Blog Niche
  2. PICK YOUR BLOG NAME. Consider a name that is:
    1. Short and Simple
    2. Related to your Niche
    3. Catchy and Memorable
    4. Using Keywords Related to your Niche
    5. Consider using Your Name (fair warning, the debate is out on this one!)
    6. IMPORTANT TIP: Ideally you want to be able to create a .com DOMAIN NAME (website) with the blog name. For example, if your blog is called “My Awesome Blog,” you will want your website to be www.MyAwesomeBlog.com.  We will talk more about this, but you want the ability to create a “.COM” website with your blog name, and many website names are already taken, so this can limit your blog name selection. Keep reading through STEP 2 for a tool just below to double-check if your desired domain name is available. 
    7. OTHER GREAT RESOURCES: 9 Blog Name Generators, How to Name a Blog the Smart Way

Step 2: Find an Available Domain Name to Create Your Website

As I mentioned above, to create a website from scratch, you will need a Domain Name. That is the URL address for your website (like “www.google.com”). Each domain name is registered by its owner.  You will need to register whatever domain name you would like to use, so long as it’s available. 

*NOTE: Some people make money by buying and selling domain names. So if you can’t live without your domain name, and it’s already taken, there may be a chance you could purchase it from the current owner (assuming it’s not www.google.com) 🙂

Use this awesome free search tool below (⇓) from Bluehost to make sure your desired domain name is available and hasn’t already been taken by another website owner:

Enter your desired domain name in the search bar in the Blue Search Box ⇑, and the results will show immediately. (NOTE: A “.COM” URL is generally the most desirable as the most recognized url ending, but you can choose other options if you are set on a specific domain name that might be available with another URL.) 

Step 3: Choose a Blogging Platform for Your Website

A Blogging Platform is the online software that allows you to create and design your website.

You want to choose a blogging platform that is: 

  • Easy to use
  • Doesn’t require IT coding skills
  • Allows you to add helpful features and tools for your audience (plug-ins)
  • Allows you to monetize your blog (if that’s your goal!)

You want to make the best choice from the beginning, because you do NOT want to have to move your blog from one platform to another at a later date.  It is possible, but not easy and very risky. 

Check out this great article to compare several popular blogging platforms and make the right choice for you: How to Choose the Best Blogging Platform.

Why Not a FREE Website Service?  Fair Warning:

  1. Most importantly, you WILL NOT OWN your website content or blog
  2. You will have more limited support from the service
  3. You may have ads automatically added that you cannot control or remove
  4. Your first impression may not be as professional

I use WordPress.org for my blog and highly recommend it.

WORDPRESS.ORG is the #1 most popular Blogging Platform in the world. I did not hesitate to use it to create my website from scratch because it is recommended and trusted by the most profitable successful bloggers everywhere.  (Note: WordPress.ORG is NOT the same as WordPress.COM)

WordPress.org is honestly not the most intuitive, user-friendly platform to start, but there are so many resources and tutorials available to help you.  

Once you’ve gotten started, it is completely worth the work, because it allows you to market and grow your business with fantastic plug-ins.  You can set up options like email marketing, HTML ads, pop-ups, social media links, everything you need!

After you’ve decided which blogging platform to use, you will want to buy web hosting for your blog (see step 4 next for how to set up web hosting). 

Step 4: Get Hosting for Your Blog Website

WordPress.org describes website hosting this way: “Just like flowers need the right environment to grow, WordPress works best when it’s in a rich hosting environment.” 

In short, web hosting is the place your website data is stored.  Like a filing cabinet for your files or a storage unit for your belongings. 

WordPress.org is free, however you do need to obtain hosting for your website files.

Web hosting comes at a variety of prices. My personal pick, Bluehost, comes at a very reasonable price (as low as $3.95/month), and allows you the ultimate money-making essential ability to set up ads on your website. 

For web hosting, I quickly selected BLUEHOST for my blog after reading countless recommendations for their service from the same bloggers recommending WordPress.org. 

Why is Bluehost so highly recommended?

  1. It is the top recommendation for web hosting directly from WordPress.org (Check it out)
  2. It is the best bang for your buck!  A great affordable price when you’re just starting our your new blog on a low budget. 
  3. You can register your domain name (website URL) for FREE when you sign up for a 12-month plan.  

Ready to get started?  

Click here to visit Bluehost now.  

Use my Bluehost link for an amazing deal of $3.95/month when you sign up for a 36-month plan.

Click the green “Get Started Now” button to register your domain name and select a domain plan.  For easy set up, you can follow the step-by-step instructions below! ⇓

Next you will be directed to select your plan. I recommend the Basic plan to start – it should have everything you need to first get started, and you can always upgrade at a later time!

Then you will officially pick and register your domain name. (See Step 2 Above ⇑ for more details on this step). You can also register a domain name you already own, if that’s the case. 

Next create your Bluehost account, filling in your personal and billing information as required. 

Then, select your pricing plan.  As you will see, the more months you are willing to commit to, the cheaper the monthly price will be.  

Remember that blogging is challenging and will require a good time commitment to see a great financial benefit!!  Selecting a 12-month web hosting plan (or more) will:

  • Help keep you accountable to your blog
  • Offer you a better monthly price, and
  • Ensure uninterrupted service to your blog for an extended period of time. 

I personally signed up for the 36-month plan when I created my blog because I felt totally committed to jumping all in, and the amount of money I knew I would save over time was completely worth it.

At the end of the day, if you want to make money blogging, you ARE starting a business.  Starting a business is an investment, and the investment of 36-month web hosting on Bluehost is a small price to pay for the security and support on your greatest asset!! (Your website!) 

To keep it basic and save as much money as possible to start, you don’t need to select any package extras.  The only one you might want to consider is the Domain Privacy Protection at just $0.99/month.  It hides your private contact information from potential spammers. 

The next step to create your website is to install WordPress!  Bluehost makes this so easy to do. Choose a password, and WordPress will be automatically installed.

Once WordPress is installed, you can log in to your account!  Then, you will be asked some basic questions on what you want to do with your website.  

Note that these questions are simply to help support you, and you can always adjust and edit your website in any way needed as you go along!

Bluehost will then ask you to pick a WordPress website theme.  

You can select one, but I recommend you skip this step at this point until you have more time to explore all of the theme options!  (I personally LOVE the beautiful WordPress theme, Ashe Pro!!)

After you have completed all of the WordPress options set up, you will be taken the the Bluehost dashboard.  You can explore some of the features in this dashboard.  

When you are ready to really start working on creating your website, click the blue link “WordPress” to go to your WordPress dashboard. 

YOU DID IT!!

You have officially created your website. Congratulations!  

The adventure begins here.

You can start by just clicking around and exploring your WordPress dashboard!  ⇓

Keep reading for some more specific tips on how to set up your website!

Like I said before, WordPress is NOT intuitive, even if you are confident with technology.

Give yourself grace. Be patient! 

Some bloggers talk about how it takes 10 minutes to create a blog, but I seriously have no idea what world those bloggers are living in!  It took me over two months to set my blog up (while also working a full-time day job). But once you get to know the platform, I promise you will start to have fun doing it!

Here are my main points of advice for designing your website from scratch:

  1. Become familiar with the left side-bar menu on your WordPress dashboard.
  2. Read advice from other bloggers
  3. Check out the many, many helpful Youtube videos that bloggers have put together over the years.  They were my own saving grace!

Also check out my FREE list of resources to start your blog for more helpful tips and resources for success.

Step 5: Select Your WordPress Website Theme

To really create a website that can earn money for your blog, you will want a beautiful WordPress theme as a template for success.  Picking a theme for my WordPress Website was the fun part for me!!  It’s like clothes shopping for your website 🙂

What is a WordPress Website Theme?

A WordPress Website Theme is a collection of template pages for you to use all over your website while maintaining a professional, consistent look.  It offers specific style, color combinations, and overall appearance.  Every theme can be edited to your liking (some more, some less), but the more you like the theme as-is, the less work you need to do!

Where do you find a WordPress theme?

On your WordPress dashboard:

  1. Go to the lefthand menu
  2. Select “Appearance”
  3. Select “Themes”
  4. Select “Add New”

Here you can explore all the MANY themes available through WordPress, including the Ashe theme. (The theme I chose for this site and LOVE – see all the details below!)

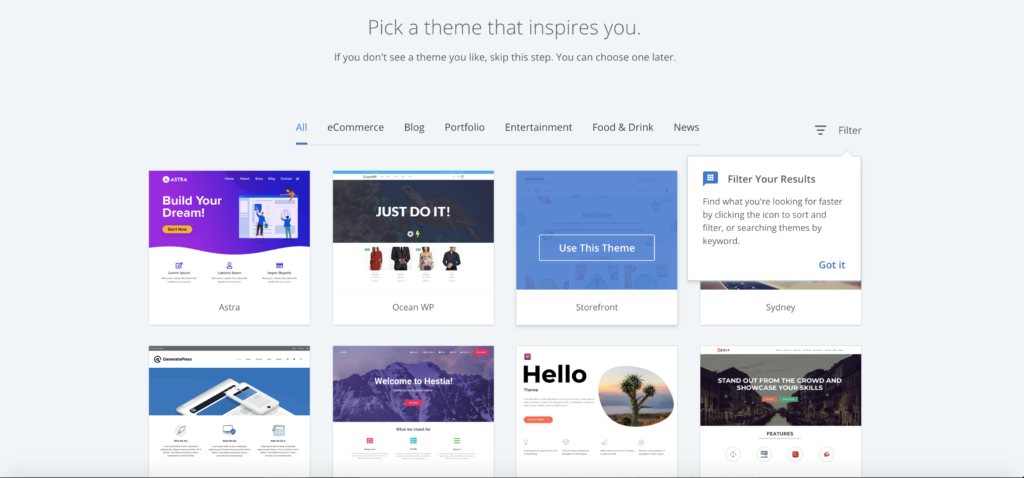
Look through them all and try them out! You can install and uninstall them without consequence before you’ve begun designing content. 

What should you look for in a WordPress website theme?

I knew that I wouldn’t want to go back and switch themes once I had gotten started creating my website, so I was committed to finding a great theme from the get-go.

You want to find a website theme that:

  • Fits your style, your blog niche, and your audience
  • Is responsive to all kinds of devices – mobile, tablet, and desktop
  • Has good reviews from other users
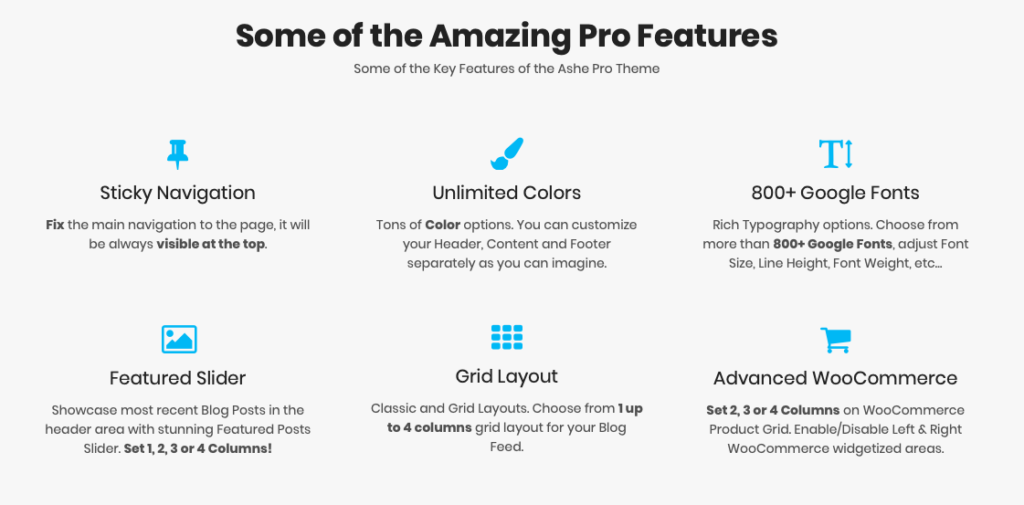
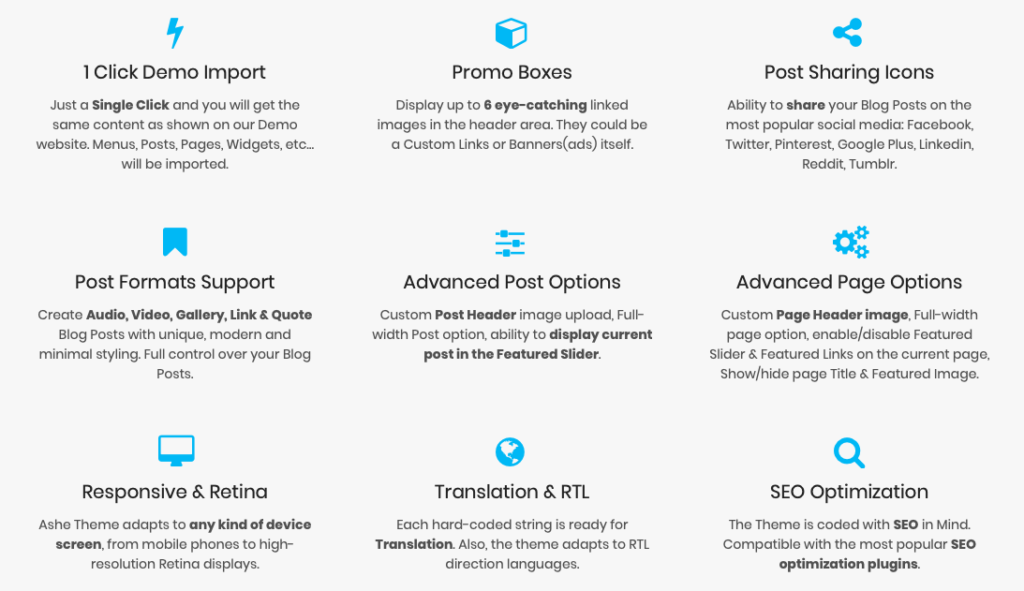
  • Provides good features like flexible page design, Featured articles, and social media links (to name a few)

For even more details on themes, check out this article on what to look for in a wordpress theme: A Massive Guide on How to Choose a WordPress Theme

How much does a website theme cost?

There are plenty of free themes you can choose from. Paid themes range from $10 up to $100+.

Like everything else, I wasn’t willing to quickly cough up money to pay for a website theme. However, I tried probably 8 different free themes before realizing that the limitations in free themes simply didn’t give me the design look I really, really wanted.  That included things like a full font selection and other design customizations. 

I did more research and also found that free themes often are less customizable, don’t receive updates as often as paid themes, and offer less support to you as the blogger. 

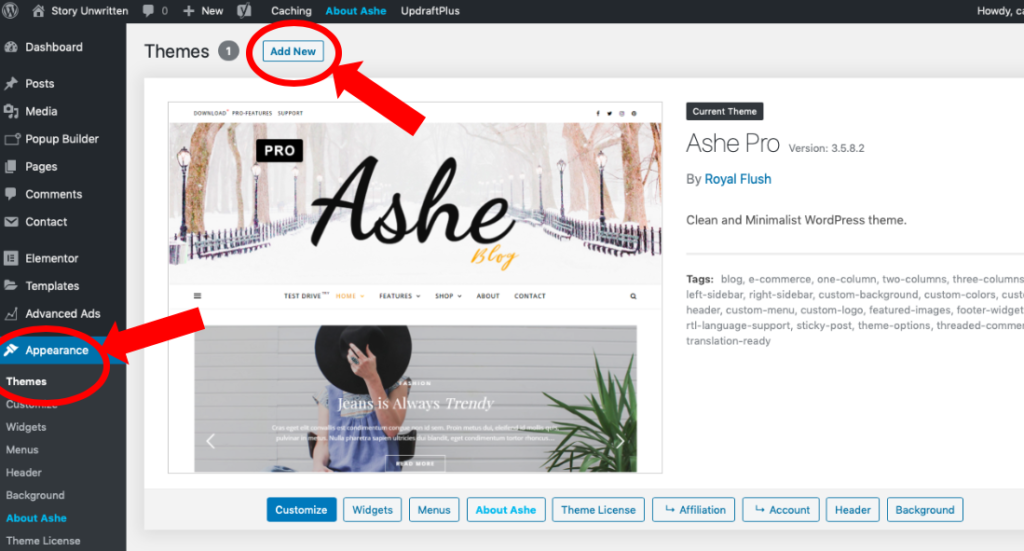
That’s when I gave in and resigned myself to considering paid-for themes and fell in LOVE with the ASHE PRO Theme by WP Royal!!  

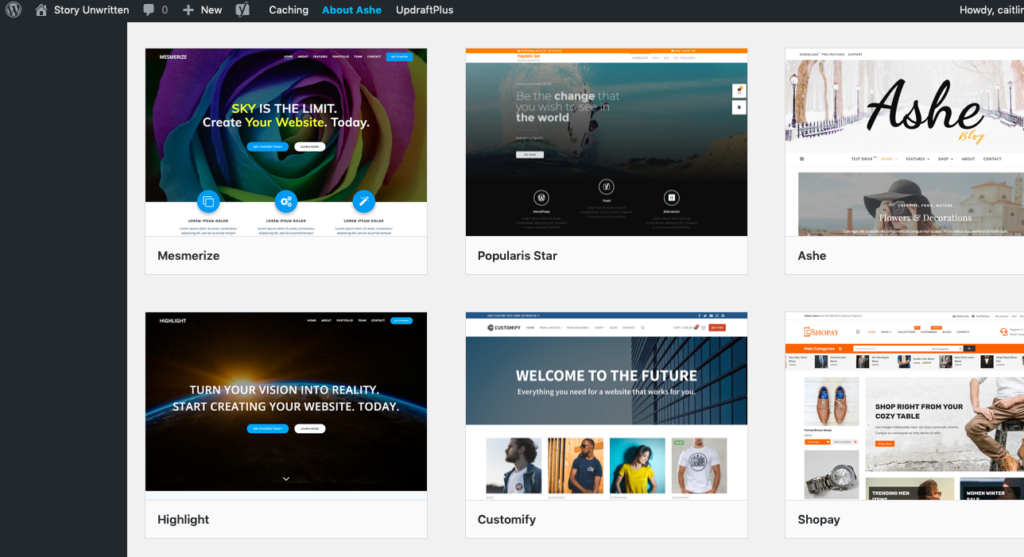
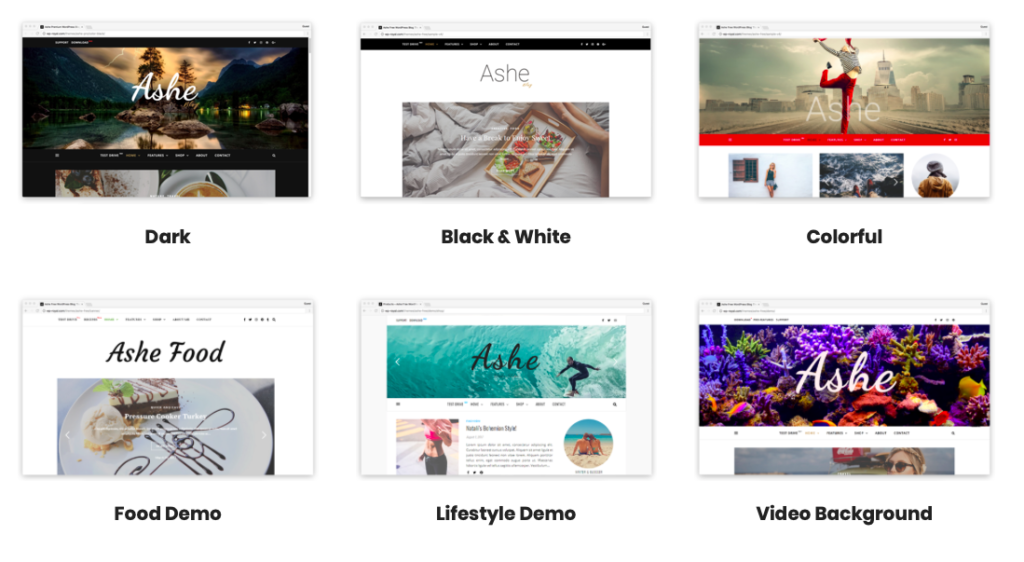
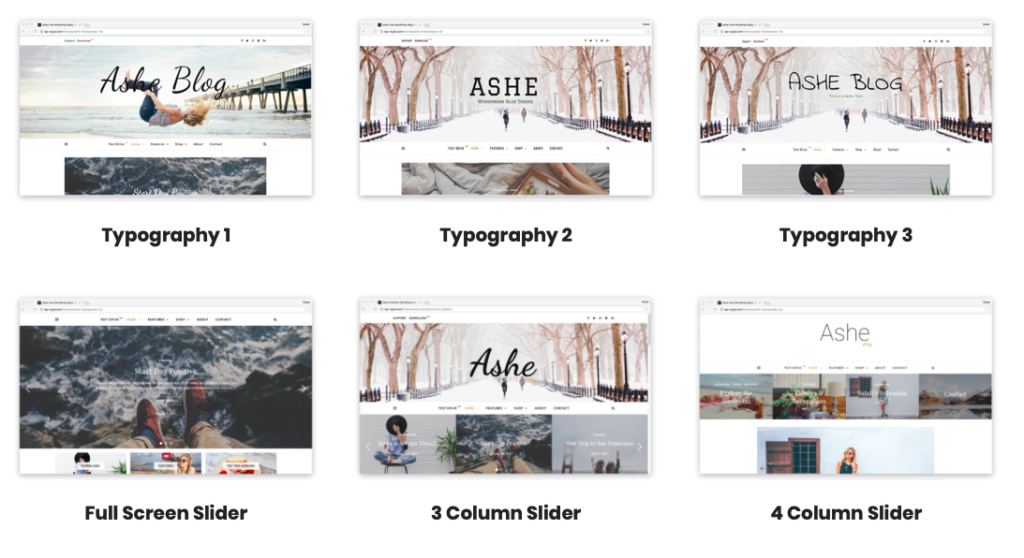
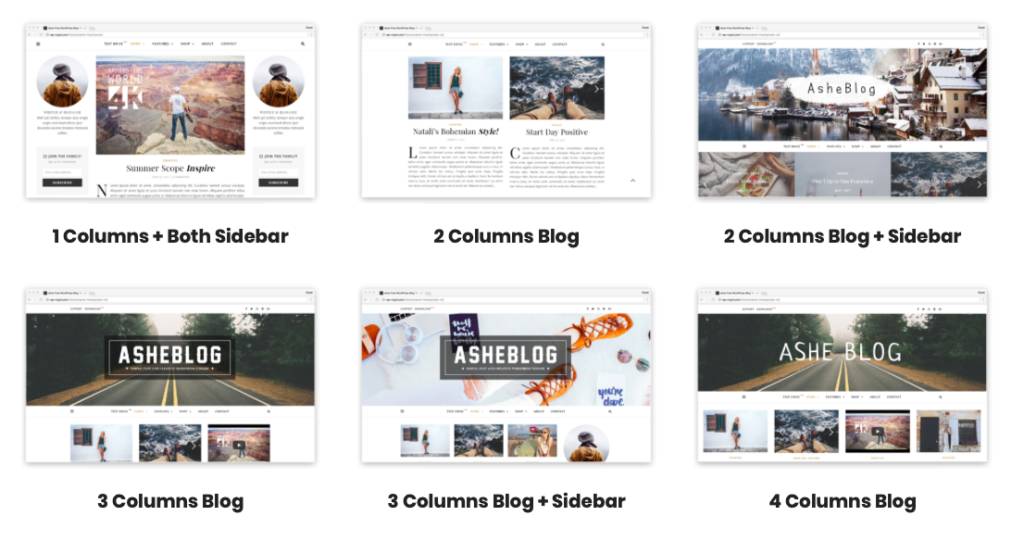
Let me show you the beautiful designs the Ashe Pro theme offers, ready-to-go.  When you visit their website, you can click directly into any of these samples and view them as full blown websites so you can envision exactly what is possible for your own website!

My WordPress Theme Pick: Ashe Pro

Everything you see in the Ashe Pro sample designs is completely customizable

Check out all of the special features for the Ashe Pro theme:

ALL of this Pro-level design, special features and support is so affordable! I couldn’t believe the features I could get above and beyond the free themes for only $29.99 TOTAL.  

If you’re still feeling wary of investing money into a theme at this point, Ashe also comes in a free version, which you can find right in your WordPress dashboard.  You are able to upgrade to the Pro version, Ashe Pro, at any time, and you wouldn’t need to start from scratch.

WP Royal says “When you upgrade to the premium version of a product, everything integrates seamlessly with your free version. The PRO version will just add the extra features and your existing content won’t be lost.”

No matter what theme you choose, make sure you have great support. 

Now that you’ve selected your theme, it’s on to the hard work and creative fun!

Step 6: Design Your Website

Here I won’t lie to you: Here is where the hard work really begins!  I also found it very fun and incredibly rewarding.

Designing your website is the most time-consuming part of creating a website from scratch.

It is a personal experience, so my #1 recommendation is to PLAY!  Play with your theme, with WordPress, with plugins, with posts, and pictures and more!  Discover what looks good, what works and what doesn’t.

Secondly, take full advantage of the free tools at your disposal because there are thousands.  If you get the Ashe Pro wordpress theme, it comes with template designs and demo pages you can just drop right into your site and edit with your own details. They are AMAZING and such a time-saver! 

Here are some of my other FAVORITE resources to get started designing your blog (most of these are completely FREE!):

  1. Color Palette ideas from Canva
  2. Create a beautiful FREE logo and social media marketing
  3. Google’s Font exploration tool
  4. Elementor Plugin for FREE page design (available through your WordPress Dashboard / Plugins)
  5. Photos for your Website: Check out this great resource article “21 Amazing Sites with Breathtaking Free Stock Photos”

What plugins should I install?

Plugins are a whole different journey on their own, and I’m not going to discuss them in detail here.  Plugins allow you to easily add amazing beneficial features to your website like a form for readers to fill out, social media sharing buttons, and pop-ups for newsletter sign ups.

Check out these informative articles for more details on popular plugins: 22 Best WordPress Plugins for Blogs and 47+ Best WordPress Plugins for Your Website

What pages should I have on my blog?

You will also want to focus on some key pages before you begin blogging. These aren’t required, but I definitely recommend them:

  1. Home Page
  2. About Page (Check out this article on writing a strong “about me” page)
  3. Contact Page
  4. Necessary Legal Pages (check out this helpful article on Critical Legal Pages)

Step 7: Start Blogging

The full process of creating your website for your blog is very challenging and takes time if you want to do it well! 

I am a mother and wife, and I have a full-time job. It took me 3 months to feel like my blog was up and ready to go. Though, to be honest, I am still constantly tweaking – I think that’s just how it goes!  I know some people have done it much faster and some will take longer.

Go at your own pace – the process of initially creating your website sets the foundation for your blog moving forward.  Adding blog posts will flow once the foundation is built!

It is very scary to begin and put your product out to the world, but you just need to jump in with both feet and begin.  There will always be an excuse to delay, or keep improving little things here and there, but eventually you just need to get going!

More articles to come on how to create a successful blog to make money – keep an eye out for more soon! I love being on this journey with you!

Best of luck, friends 🙂

Caitlin

THIS WEBSITE CONTAINS AFFILIATE LINKS, WHICH MEANS THAT IF YOU CLICK ON A PRODUCT LINK, I MAY RECEIVE A COMMISSION. THIS WEBSITE IS A PARTICIPANT IN THE AMAZON SERVICES LLC ASSOCIATES PROGRAM, AN AFFILIATE ADVERTISING PROGRAM WHERE I EARN ADVERTISING FEES BY LINKING TO AMAZON.COM.

Other Articles Trending Now

how to create a website

Share

14 Comments

Leave a Reply

Your email address will not be published. Required fields are marked *